Difference between revisions of "Installation:website"
From PrometheusIPN Wiki
| Line 21: | Line 21: | ||
cd path/to/installdir | cd path/to/installdir | ||
| − | sudo chown www-data:www-data install.php img/pkgs updates | + | sudo chown www-data:www-data install.php img/pkgs updates themes |
sudo mkdir cache/auto | sudo mkdir cache/auto | ||
sudo chmod 775 install.php cert/* ipn_errors.log img/pkgs cache/* updates | sudo chmod 775 install.php cert/* ipn_errors.log img/pkgs cache/* updates | ||
Revision as of 13:23, 3 October 2015
Video tutorial
WEBSITE INSTALLATION
The web installation is pretty straight forward.
- Extract the contents of the "Web files" folder to your web server
- Edit the file config.php to fit your MySQL database details
- Create the database you specified above
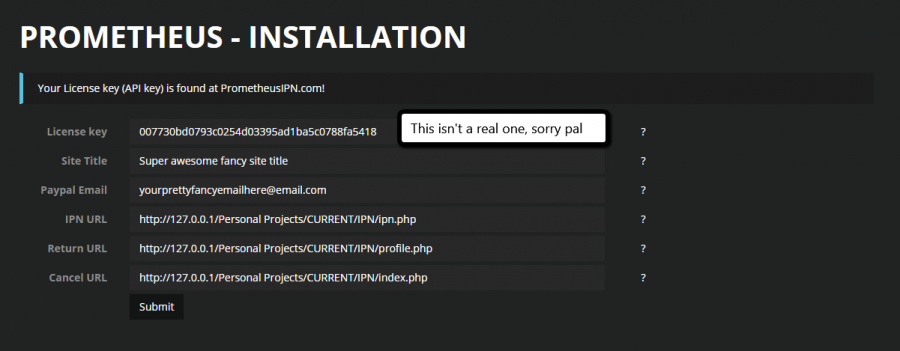
- Visit yourwebsite.com/install.php Now you will see something similar to this:
The three last fields will be automatically filled in and the other ones are pretty self explanatory.
The next step is for Linux only Make sure to set the right permissions for your files! This can be done by running these commands in a linux terminal:
cd path/to/installdir
sudo chown www-data:www-data install.php img/pkgs updates themes
sudo mkdir cache/auto
sudo chmod 775 install.php cert/* ipn_errors.log img/pkgs cache/* updates
sudo chmod 0777 cache/auto themes
The next step is for Windows only!
- Create cache/auto
- Right click on it -> Properties -> Security and make sure guests have access to write to the directory
When the installation is done the first user to sign in gets admin priveleges
